
Do you want to start your WordPress blog? I was feeling excited to show you the full complete tutorial you can follow in this guide, how to start a WordPress blog on Bluehost. Blogging is interesting and easy. It’s a passion project. You can do it anytime and anywhere. Most people still don’t know that blogging is very powerful to increase their income as a side hustle or even becoming full-time income from their blog.
Blogging is an investment for yourself. You can grow your blog income like a snowball from time to time. Even now, video content is getting more popular. The blog still works very well and will always work forever because many people enjoy reading on the internet. This is how a blog will serve that audience demand on the ocean of the internet.
In this guide, I will share with you how to start a WordPress blog on Bluehost. It’s easy and fast to set up your blog live on the internet. You don’t need any special coding skill knowledge. Before we jump into the step-by-step procedure to create your WordPress, I know some of you still new to the blogging world and have a general basic question about blog, WordPress, and Bluehost. Let me explain it succinctly.
Table of Contents
Why Start a WordPress Blog?
WordPress gives you the ability to create your blog post. Besides, it’s cheap to start your Blog on WordPress since the only tiny investment you will need to spend is the hosting fee from Bluehost, which is $3.95 a month. There are several reasons why I encourage you to start your WordPress blog.
- Blogging can be a space for you to share your knowledge, experience, and expertise with the world. You can build your authority from your blog, and the cool thing is monetizing it to earn money.
- You can make additional income or full-time income through blogging. I recommend you to make a self-hosted WordPress blog using Bluehost, which I will explain later.
- If you’re a business owner, blogging can help you promote your business as you build personal connections with your readers. They will eventually buy your product because they love your blog content.
- Your blog is a digital asset that has valuation and can be sold to earn money
- Blogging is great for self-development since it requires you to learn new things like writing skills, tech skills, and digital marketing.
How much does it cost to start a WordPress Blog? Is WordPress Really Free?
WordPress blog itself is free. You will not charge for any money, only when you decided to switch to a self-hosted WordPress blog using Bluehost, which I recommend. You will be charged a small fee investment of $3.95 a month.
What’s the difference between WordPress.com and WordPress.org?
I see many people still don’t understand the differences between WordPress.com and WordPress.org. When you start your free blog WordPress.com (it’s not self-hosted), you can still write and publish a blog post. However, you don’t own the blog because it’s not self-hosted. It means WordPress.com can take down your content without any further notice if they see you’re violating their terms and condition. It’s not good for your blog sustainability in term of monetization strategy.
If your domain name still ebizstrategic.wordpress.com, it’s means you’re still don’t own your website.
But, when you have the domain name ebizstrategic.com, it means you’ve self-hosted a WordPress blog like in this case using Bluehost. That’s what we called it WordPress.org. So in this guide, when we refer to “WordPress”, we are talking about WordPress.org. I highly recommended you to use Bluehost as a self-hosted website if you plan to monetize your blog.
How Do I Self Host My Blog?
The best recommendation for a new blogger to self-hosted their WordPress blog will be using Bluehost. It’s cheap ($3.95/ month) and easy to set up.
Is Bluehost Good for Blogging?
Bluehost is the best hosting web choice for every new blogger who just started. It used a shared-hosting system that could afford 200K visitors without any issue. As a new blogger which the majority don’t have much traffic yet, Bluehost will be a good choice to start.

Bluehost also offers a cheap hosting plan and easy to set up. With only a few clicks, you can have your blog set up with Bluehost as your hosting. Bluehost also gives you free-domain one year as a bonus and a 30-days money-back guarantee, so there is no risk at all to try Bluehost for your blog.
How Bluehost Work?
Bluehost work by providing shared hosting in which several users shared space to use a single server maintained by Bluehost. It’s a good choice for the new blogger who just started since they can start with a very super low hosting price with a shared hosting system.
Why Bluehost is The Best?

Bluehost become the best hosting for every new blogger due to several reasons:
- Bluehost’s price is super affordable since they offer very cheap hosting for someone who started a blog with only $3.95 a month.
- Easy and quick WordPress automatic installation with only one-click
- You get a FREE domain for one year and 30-day money-back guarantee
- Bluehost has excellent customer fast and 24/7 support
- Recommended by WordPress since 2005
- FREE email domain, you will be given a free email with your domain name (name@blogname.com)
- FREE SSL certificate included, it will mark your website as safe, which build trust in your site in front of the reader

P.S.: If you are signing up Bluehost through my link here, in exchange, I will send you a FREE GIFT eBook “The Best Free Traffic Compilation Method” written by me at NO cost ($39 value). Please send me an email to “juherianto@ebizstrategic.com” with a screenshot of your Bluehost receipt along with the domain name. This ebook will give you all the best strategies, tips, and tricks to drive free traffic to your blog, so you can save your time and energy by following the guide in the ebook. Lastly, I am not sure when this low pricing hosting will go away, so take advantage of it while it lasts!
How to Start a Blog with Bluehost in 10 Minutes in 2021
Let’s back to our main topic, how to start a WordPress blog on Bluehost. The tutorial will take you approximately 10 minutes to set up six simple steps. Ready to jump in? Let’s do it!
Step 1: Sign up for a Bluehost Hosting Account For Your Blog
The first thing you have to do is started from the Bluehost home page to register your account. Click “Get Started” button on the home page. On the next page, choose a BASIC plan. You will be prompted to the page to enter your domain name.
Step 2: Get FREE Domain Name From Bluehost
In the second step, you will need to determine the domain name you want to use. I recommend you to find an available domain name with a .com extension will be preferable. You can use .net and .co also as an alternative.
It’s important to have a domain name that easy to spell and remember. Let me share with you some useful tips for choosing your domain name.
Tips for choosing a domain name:
-You don’t have to be overthinking your domain name. Please keep it simple, easy, and memorable.
-You can use your name as a domain if you don’t know yet what niche exactly do you want to focus on. Having a name on your domain allows you to be a lifestyle blog with a different topic niche.
-Keep it no more than two words, or a maximum of three words.
-If you need some idea for your domain name, you can use domainwheel and business name generator as a domain name generator to help you give various word combinations. It’s FREE.
Note: you don’t have to buy a domain name since Bluehost will give you a FREE domain name for one year when you sign up for a Bluehost hosting. If you already have a domain previously and wanted to use Bluehost. You will need to connect your domain to your hosting account. Every domain provider has a support page to help you do this job or contact the support to help you.

Step 3: Entering Your Account Information
The third step is entering your account information like name, business name, address, phone, and email. Ensure to enter the email that you can access since it will be your login email to your account. All your login information will also be sent to the email you registered.

After filling up the account information, next, you will need to choose the package.
Step 4: What Bluehost Plan Should I Get?
Bluehost offers three packages plan. I recommend you choose the 36-months plan for $106.2 (first three years) to get the lowest price and save your money. If you want to test for the first year of your blogging journey, you can then choose the 12-months plan for $59.4. The next year you will end paying again, but this should be fine as long as you can earn money within one year.

Regarding the package upsell, you can uncheck all of them because you don’t need it for now, your blog is just started nothing you have to do with the extra package. You can get the extra package later after you start consistently making money from your blog.

If you want to take the package extra in the future, I recommend you to checklist the domain privacy protection which can protect your personal information that is publicly visible on the internet.
Step 5: Inputting Your Billing Information
Finally, move on to the next step inputting your payment information. If you don’t have a credit card, you can use PayPal as an alternative payment by clicking more payment options. Read and accept the terms, click submit.

Step 6: Installing WordPress in Bluehost
Once you have purchased the Bluehost package, you will receive a bunch of information regarding your Bluehost account to your email. Next, you will need to set a password for your website.

Congratulations! you have successfully installed your WordPress blog in Bluehost automatically. Now, your blog is officially live on the internet with your domain name and self-hosting plan.
After that, you will be prompted to a page to choose a theme for your website. You can do it now or later. I recommend you to skip it. I will explain to you later about choosing the theme for your blog.

Now, you can log in to your WordPress dashboard account with the link: https://yourblogname.com/wp-admin
If you have any questions to ask, the Bluehost support team is available 24/7 to help you.
Wait, we’re not done yet! Because I still need to show you how to set up your WordPress blog in the next part of the guide. I will show you step by step to set up your WordPress blog to be ready and make your first blog post. It’s gonna be very interesting to show you the tech stuff of WordPress which is simple and easy.
Special Announcement: if you haven’t signed up yet for the Bluehost to start your blog. I recommended you start by signing up through my special link. Don’t forget to send me your Bluehost receipt along with your domain name to my email “juherianto@ebizstrategic.com“ because I have a FREE GIFT for you, I will send you my Ebook “The Best Free Traffic Compilation Method” written by me ($39 value) to help you drive organic traffic effectively to your site. This ebook will guide you with the best actionable step by step, strategies, tips, and tricks that will cut your hassle and overwhelmed to drive traffic to your site.
If you have signed up for the Bluehost from my link, we can continue to the step-by-step tutorial below.
WordPress Dashboard Introduction
When you log in to your WordPress dashboard, you will see several menus on the left side of the dashboard. Let’s take a look at each menu:
–Posts: This is the menu to see all the blog posts that you have made. You can start writing your first blog post by choosing post -> add new
-Media: You can manage photos and videos like upload and delete.
–Pages: This is where you can start to create a static page for your websites like about us, term and services, privacy policy, and contact page. This page will not show on the RSS feed. It’s not like a blog post shown in chronological order.
–Comments: You will find all the reader’s comment on your blog post
–Appearance: You can edit your theme, widgets, menu, background, and header
–Plugins: plugins can help to expand the functionality of your blog. We will discuss the plugin in a separate section.
–Users: You can add a new author and set permissions
–Tools: Only use this for technical stuff when you want to move an existing blog from WordPress.com to WordPress.org
–Settings: This is where you can set the rule for your blog, like the URL, discussion, writing, and reading.
Setting Up Your WordPress Blog
After introducing the WordPress menu, we will start setting up the tech stuff on our WordPress blog. We need to set up several things when building our blog to be ready for visitors. All the setting part will be done either on the Bluehost dashboard or WordPress blog.
Activating Free CDN Cloudflare
The first step is to activate your free CDN Cloudflare. You may be asking what does CDN for? CDN stands for Content Delivery Network. It can help to move your content closer to your website visitors by caching your content across a global network of servers to speed up your site and increase overall performance. So it’s clear that CDN can help fasten your website speed to show it to your website visitors.
Currently, to activate your CDN on Bluehost, you will need to connect your Bluehost account to a free Cloudflare account. Then, you will be asking what Cloudflare is? Well, let me explain it to you. Cloudflare is a free CDN provider available on the internet. That’s why we will be using it as CDN for our website. Here the step you can follow to activate it.
Go to your Bluehost dashboard, then click “My Sites” on the left side of the dashboard. Next, click “manage site“, and go to the performance tab.

Bluehost makes it easier to install Cloudflare. If you’re not tech-savvy simply click “Install Cloudflare“, then your Cloudflare will be activated automatically, no other action is needed. In this case, you don’t need to register a Cloudflare account since you have activated it through the Bluehost connection.

Once you have done the installation of free CDN Cloudflare on your Bluehost account, the display will change like the picture below.

Activating your Free SSL Certificate
The second step you need to do is activating your free SSL certificate. SSL stands for Secure Socket Layer. What does SSL do? It will secure the data transfer between the user browser and the website they’re visiting. The website which has SSL will have URL with “https”. The “s” after “http” means the website is secure, as can be seen with the browser bar’s padlock icon.
![]()
![]()
To activate the SSL on your website, you need to go to your Bluehost dashboard account. Then, click “My Site” on the left side of the dashboard, next click “Manage Site”
After that, choose the Security tab and toggle ON SSL Certificate. Done! Your website is now protected with SSL Certificate.

Setting Up a Custom Email Address for your blog
The third step will be setting up your custom email address. One of Bluehost’s bonuses is a free custom email address (100Mb Storage) that allows you to put your domain name into your email, making your email look professional. Your custom email address will become yourname@domainname.com.
This custom email domain will be beneficial for us whenever we apply for the affiliate program. It makes us more credible in front of the company that offers an affiliate partnership, increasing our chance to be accepted as an affiliate. The custom email domain is also building trust when we approach another blogger for a guest post.
How to do that? Well, let me show you the step by step procedure. First, you need a dedicated Gmail account for your blog. Actually, you already have it, which is your primary email address (domainame@gmail.com) that you use to register for your Bluehost.
Second, you need to login to your Bluehost control panel: https://my.bluehost.com/web-hosting/cplogin
After that, click on “Advanced” on the panel’s left side, then the Cpanel page will appear. Scroll down to the EMAIL section part (the blue bar) and click “Email Account” as seen from the picture below.

After that, click “Create” button so you can create your first professional email account! As you can see that you have five slots to create different email domains.

On the next page, simply enter the email’s username, you can input your “first name” or “contact”, it’s totally up to you. Kindly keep in mind, you have 100Mb maximum free storage for the free account, which is good for you as a beginner. If you have entered username and password, click “Create”

Congratulations! you now officially have a professional email for your blog. 😊
Wait, there is another thing I want you to set up on your professional email to make your work even more efficient when opening and replying email. You currently have two email accounts to check your inbox, first your domainname@gmail.com and second your professional email, which is yourname@domainame.com.
It will be good if you can operate both email account from one account only. So, the basic idea to make your work more efficient will be:
–Receiving email: when you receive an email to yourname@domainame.com, the email will be forwarded to your domainname@gmail.com
–Sending email: when you send an email from domainname@gmail.com, the email will be sent as yourname@domainame.com to your recipient
Pretty cool, right? It’s more efficient for you to work from one Gmail account, which is your primary Gmail account domainname@gmail.com.
Let’s break down the step one by one.
Setting up receiving an email to your domainname@gmail.com from yourname@domainame.com:
-Log in to your Bluehost account, then click the “Advanced” menu on the left of the dashboard
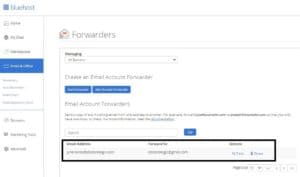
-Scroll down the cPanel to the EMAIL section part, then click “Forwarders”


-Click “Add Forwarder“, then add the address to forward, which is your yourname@domainame.com, and on the destination part (Forward to Email Address), enter your domainname@gmail.com.
-Then, click the blue button “Add Forwarder”

Perfect! You have successfully forward all your email from professional email to your primary Gmail account.
 Setting up sending email from yourname@domainame.com and sent as domainname@gmail.com:
-Go to your primary Gmail account (domainname@gmail.com)
-Click on the small circle icon on the top left and click “See all settings”

-Next, click on the “Account and Import” tab, scroll down to the “Check mail from others account” section. Then click on the “Add a mail account”

-The orange box will appear and input your professional email (yourname@domainame.com), click “Next”

-In default, you will be chosen “import emails from my other account (POP3)“, click “Next”

-In the next part, you will need to input this information below
Username: yourname@domainame.com (professional email)
Password: Password of your professional Email
POP Server: mail.ebizstrategic.com
Port: 995
Note: Only checklist “Always use a secure connection (SSL) when retrieving email”. While the rest, keep it uncheck so your inbox will never get full (100Mb max).

-After done click “Add Account“.
Note: In case you can’t proceed to “Add Account“, you will need to ask Bluehost support regarding the POP server information for your account. They can help you very fast in chat 24/7.
Congratulations! Now you have successfully connected your outgoing email. So, whenever you are replying or sending an email from your primary Gmail account (domainname@gmail.com), you can choose whether sent it as your professional email (domainname@gmail.com) or domainname@gmail.com like the picture below. It’s cool that you can choose it.

Installing Website Plugin
Website plugin is like apps on your smartphone. You can install any apps to get specific features that you don’t have on your smartphone. The same thing as the WordPress plugin, you need to install several plugins to get a certain feature to improve your blog functionality. The beauty of the plugin is that you don’t need to have coding skill. Simply install it to your WordPress.
In default, you will get the certain plugins already installed on your WordPress account. You don’t need all these plugins. I will recommend you which plugin to remove and the list of the plugins that you need to install to make your WordPress blog on a good stand.
Delete this plugin before moving on
I highly recommend you delete these plugins below from your WordPress since you don’t need them. Since the more plugins you have, it can make your site speed slower.
–Akismet Anti-Spam: You can review every comment on your WordPress blog manually before permission to publish
–Google Analytics for WordPress by Monsterinsights: you can install Google Analytics to your site using another plugin Site Kit
-Hello Dolly: it’s useless plugin there is no functionality given, you don’t need it
–Jetpack by WordPress.com: I will show you another plugin that can replace jetpack and it’s free
-OptinMonster API: you don’t need it if you don’t use Optin Monster
WordPress plugins you should use
After deleting an un-useful plugin, here is the list of plugins that useful for you as a beginner. I recommend you to install these plugins:
–Classic Editor: This plugin will bring back your WordPress editor draft page to the classic view, making it easier to work on your blog post.
–Rank Math: This is the plugin you need to audit and improve your on-page SEO. The great thing is that Rank Math’s feature is free, while on the Yoast SEO, we need to pay to get the feature. Hence, I recommend installing Rank Math.
-Wordfence Security: it’s used to secure your website from malware, and it’s free to use.
–Shareaholic or Social Pug: You will need this plugin to show social media share icon on your blog post, it can help to boost the social signal to your site if the reader shares your blog post to their social media. Don’t worry. It’s free to install.
–Imagify: it’s used to reduce the image file size without reducing the quality. It helps to make your website load faster and free to use. If you want to compress all your image size manually without using this plugin. I recommend you to use https://tinypng.com (it’s free). You just need to compress all of your images manually first before uploaded into your blog post.

–Site Kit by Google: this plugin is a one-stop solution for all Google’s products like Google Analytics and Search Console. You can manage and monitor everything from a centralized location.
Installing Your Website Theme
I could say the theme is like cosmetic decoration for your house. It makes your house looks beautiful by painting it. This is what website theme does, enhancing the looks of our website.
You will need a theme to make your blog layout looks great on the eye of the visitors. At the beginning of your blogging journey, you can choose the free theme first, then when you already make money from your blog. You can switch to the paid theme later on.
If you’re looking for a free theme, here some website recommendations to get the free theme.
-My.studiopress.com
-Mythemeshop.com
-Themeforest.net
You can use those websites also when you wanted to upgrade your website theme to a premium version.
You may be asking if using the free theme can make money online, why do we need to upgrade to the paid version later on. Here are the reasons:
-Paid theme looks more professional (increase trust and credibility)
-More features and option on the paid theme version
-The paid theme has a better speed page and improve your SEO ranking
-Prioritize customer support
-No subscription fee, only one time-investment
Adding Articles to Your Blog
Oke, now you have chosen a theme for your blog, here comes the essential part of blogging. Writing your first article, you don’t have to create a perfect article. Just write something honestly based on your knowledge and experience. You can edit your article anytime. No one will know that there is a change in the article. Don’t overthink, keep it simple.
How to Write a Blog Post for Beginners
It’s time for you to start writing your first article. Go to your WordPress dashboard, click “Posts” on the dashboard’s left side, and click “Add New”

Then, you can start to write your first blog post. I recommend you write your first article on the word file or Google docs first as a draft so that you can edit it before copy and paste the final one into WordPress. It’s also a best practice to back up your article on a Word file or Google docs.
Important: naming your permalinks
Permalinks are the URL of your blog post title. In default, WordPress will use the title of your blog post automatically as the URL of your blog post. It will look like this:
https://www.domainaname.com/titleofyourblogpost
The issue is coming when you have a very long blog post title. Your permalink will become too long and not good for SEO. Hence, you will need to edit the permalink manually. Make it short and to the point, and include some of the primary keywords you want to target.
How to Insert Image to Your Blog
It’s easy to insert an image into your blog post. You just need to click “Add Media” button on your WordPress draft, and in the upload files tab, click “Select Files” and choose the images you want to upload to your blog post.

Where to get free stock photos?
When you need free stock images, you can use several resources to get free stock photos. You may be thinking of getting free pictures from Google. I want to warn you that don’t use Google as free image resource on your blog since there is no license and reuse term. You may get sue in the future if you use the pictures from Google.
Instead, I will recommend free stock photos that you can use safely, which has a license to reuse. Here are the lists:
–Pixabay.com
–Pexels.com
–Unsplash.com
–Freepik.com
–Burst.Shopify.com
–Stocksnap.io
You can use several resources to have more selection for your blog post photos. All the photos from those websites can be download free without having to pay any money.
The only downside of using free stock photos is a limitation of quality photo selection, and some photos don’t look professional. If you want to use the premium version, which has high quality and even more photo variation choice. I recommend you to use the Freepik premium. They have millions of high-quality photos selection for every niche or topic you blog about. You can choose whether you want to download stock photos or graphic images.

How to Create Internal and External Linking
You will need to create internal linking on your blog post to help a reader find related content on your blog post. It can help improve the user experience on your blog. That’s why Google values internal linking.
The same thing on external linking in which you will be referring to a trustworthy website outside of your blog. It tells Google that you refer to a reputable source, which gives Google a signal that you’re the resource that can be trusted.
To create internal and external linking on your blog, here the step you can follow:
-Highlight the words or phrases you want to add a link to.
-Click the chain icon (hyperlink) on your WordPress draft.
-Copy and paste the destination link into the textbox

-After that, click the small little wheel icon on the textbox
-Ensure to checklist “Open link in a new tab“. It will allow the reader to be still on the current page when they click on your link to another page.

How Do Bloggers Make Money (Even Beginner Blogger!)
There are several ways to monetize your blog to earn money online. As long as you have traffic to your site, then you can monetize it no matter the amount of traffic coming in.
–Affiliate Marketing: This is the most favorite monetization strategy since you don’t need to have a bunch of visitors to make it work. All you need is a few targeted visitors who are interested in the product or service you recommend. In exchange, you will get a sales commission if the visitors buy from your affiliate link. You can drive sales conversion even with only a few visitors.
–Display Advertising: This kind of form of monetization needs a huge amount of visitors. It’s not suitable for the new blogger who doesn’t have large visitors yet. You will be paid by displaying any advertising on your blog.
–Selling your Digital Product or Services: if you have a specific skill set, you can offer services on your blog or even selling your digital product like ebook or courses.
–Sponsored Post: This is when the company (brand) pays you to create a sponsored post promoting their product or services.
P.S.1: If you haven’t signed up yet for the Bluehost, I recommend signing up through my special link. I have a special GIFT for you if you buy through my link, I will send you my ebook “The Best Free Traffic Compilation Method” at NO cost ($39 value) that will help you drive the free traffic to your blog. It consists of the best compilation strategy, tips, and tricks that you can implement directly for your blog. Lastly, don’t forget to send me your Bluehost receipt along with your domain name to my email at “juherianto@ebizstrategic.com”, so I can send you the ebook 🙂
P.S.2: if you already have your self-hosted WordPress blog. I highly recommend you to take my ebook “The Best Free Traffic Compilation Method” ($39 value), which consists of actionable steps, best strategies, tips, and tricks driving organic traffic to your blog. The ebook is a one-stop-solution for free traffic, it compiles all the free traffic best strategies in one ebook. You will not find this kind of ebook on the internet! it’ exclusive from my blog 🙂
Final thought: How to Start a WordPress Blog on Bluehost in 2021
All right! Congratulations on reading and following the guide so far until finish. I believe, if you follow all the tutorials on how to start a WordPress Blog on Bluehost in this guide, you will not feel overwhelmed to set up your WordPress blog with Bluehost.
Building a blog is an interesting thing to do. It’s like building your passion project that becomes a passive income generator. It will become your business that brings primary income to your life if you take it seriously. It’s like building digital assets in the long run, which will grow like a snowball.
Don’t forget to pin and follow me on Pinterest!

In the end, I want to hear your blogging journey to start this year and make your first blog post live on the internet. Once again, congratulations that you have read the guide until the end! I wish your blogging journey success! Let me know if you have any questions regarding how to start a WordPress Blog on Bluehost in this guide. I will be happy to help : )
Enjoy this post? bookmark and share it on social media!